Hi Friends,
Here with a card I made for my son to give to a friend. She has three dogs and likes yellow. Update! He chose this card for his new lady friend!
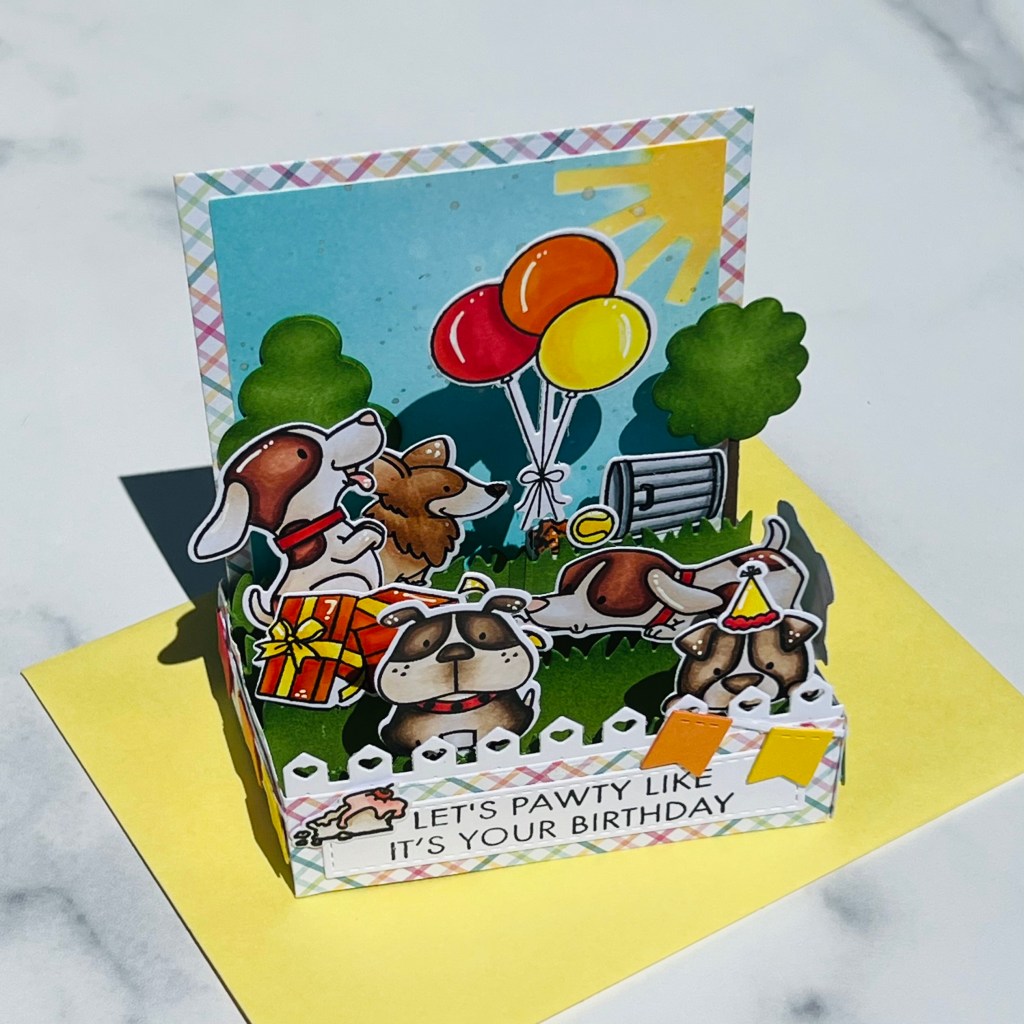
So I started off with using MFT Outside the Box with low profile. Die cutting the box itself with MFT Sweet Celebrations 6X6 paper pack. The four inserts of grass was from Gina K. Designs – Grass Green cardstock. Also cutting out the panels for the sides with Neenah Solar White #80. Stamped on the Let’s Pawty for the front panel with VersaFine Onyx Black. I guess I wanted to make sure I didn’t forget about the sentiment so did it right away! Cut out the MFT Tall Trees from GK Grass Green and MFT Vintage Timber. Heartfelt Fence from Neenah Solar White #60. Also using Lawn Fawn Fish Tail Banner, the base is from Neenah Solar White #60. Banner colors are GK-Grass Green, MFT- Red Hot, Lemon Drop, Blu Raspberry, and Lawn Fawn- Fake Tan.
Next the stamping of the images that I wanted to fill the scene. On X-Press It Paper with Lawn Fawn Jet Black Ink using MFT Presents & Pupcakes, Lucky Dogs and Pawty Time with matching Dies.
Copic Pen Colors
Two Dogs Beagles – E18, E17, E15, E13 E42, E41, E40
Tennis Ball- Y08, Y06, Y02
Ball of Paper- YR 09, YR07, YR04
Trash Can- C5, C3, C1
Cake- R
22,R24, E43, E41, E40
Presents & Pupcakes
Dog,Corgi(back panel)- E44, E43, E42, E41, E17, E15, E13, E11
Scarf-Y08, Y06, Y02
Present-Y08, Y06, Y02, YR09, YR07, YR04
Balloons- R29,R27, R24,YR09, YR07 YR04, Y08,Y06, Y02
Lucky Dog
Corgi-E35,E34, E33, E31, E30, E43,E41,E40
Bitbull-E49,E47,E44, E43
Collars-R29, R27, R24
For the background panel, started off with a larger size of Neenah Solar White so I can place my die to the area I liked the best for the scene. Taking from Concord & 9th the sun from Summer Camp last year. Cutting out from GK Masking magic to use as a stencil and a mask for the sun rays. Placing the sun circle in the upper right, ink blending on Distress Oxides- Squeezed Lemonade, Fossilized Amber, and Wild Honey. Removed the circle then placing the rays over it and applying the same colors. Removed the stencil and placed the mask for the rays and sun over the inks. With my brush just for my Distress Oxides applied Distress Oxides- Tumbled Glass, Salvaged Patina, and Peacock inks.
Once the inking was done for the scene panel, placed the die over to find the best place for the scene. Running it through my Platium6 to cut it.
Time to build the box, using two sided tape and glue on the tabs for the box and grass shelves. Liquid glue makes it easier to move around if need be. Folding back the seams from the dies. Using a bone folder to reinforce the fold. Gluing the stump to the one tree and adding it to the back panel. So there is small strips in the Outside the Box that makes picks to add to your images for easier placement on to the shelf. This is the first time I’ve used them and it did make it so much easier. It pops the image above the grass rather than having them behind the grass or in front of it. Trying to make all the images visible when building the scene. Using a 1/8inch acetate stripe and a glue dot to add to the balloons to make them float.
Added the side panels, then the one dog peeking into the park. Cake had a perfect place by the front sentiment. Still having the banner to figure out where to place it. I found the one side that still had nothing was the perfect place. So then I looked at the peeking dog and thought it was funny to place the banner over it’s tail or booty! Placed just the two over on the other side of the sentiment.
With still needing the panel for any personal message on the back. Cut out one more panel and added a sentiment. Then I like to put one more cute image back there. Copic colored the dog in, and glued into place.
I know there was a lot and I hope it makes sense.
Thanks for stopping by!


Leave a comment