Hi friends, today I’m giving a small sneak peek into the upcoming Easter/Spring release over at Pretty Pink Posh Stamps. It will all be available on February 5th, and it’s so adorable! I know I say it every time, but I truly had so much fun making all my cards!
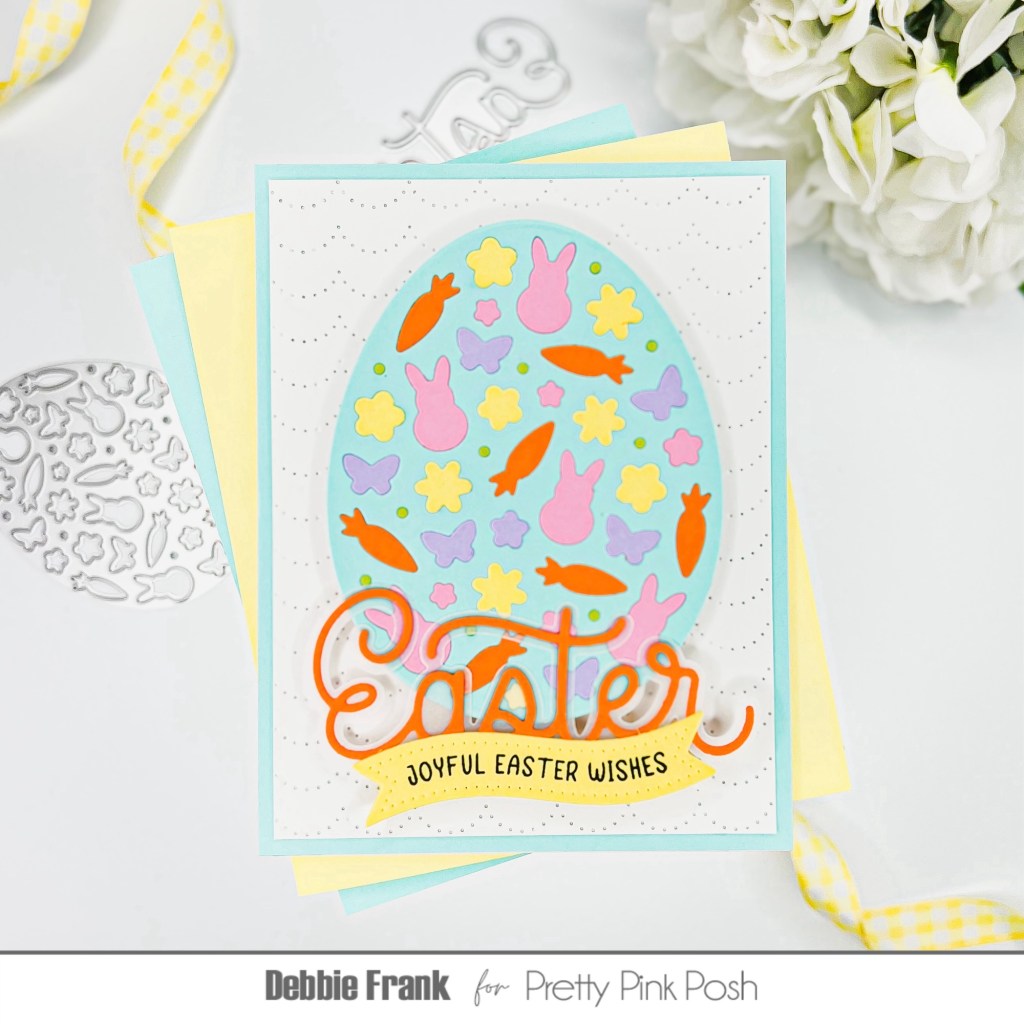
With my sneak I’m using the new Decorative Easter Egg Die. When I was getting ready to make all my Design Team cards, I chose 5 colored card stocks that matched the shaker mixes that we received. Using the same 5 colors made it sure easy to make them all look so good together!
This is the list, I know can you believe I remembered to write it all down!
MFT-Cotton Candy
MFT-Lemon Drop
Gina K- LemonDrop
MFT-Sour Apple
Lawn Fawn-Paper Bag
Lawn Fawn- Fake Tan
Concord & 9th-Aqua Sky
Yes, I ran the Decorative Easter Egg Die through the machine with all 5 colors to in lay them with the blue egg.
For the background panel, I used the Scalloped Pierced Plate and ran it through with a standard A2 panel. Then trimmed it down by 1/8 inch on all sides and matted it on the C9 Aqua Sky panel.
To make it easier to inlay all the small pieces. I also die-cut out the outside die with a white card stock and attached it to the back of the blue Decorative Easter egg. Then piece by piece I inlaid them with liquid glue.
Product List with Affiliate Links attached:
Decorative Easter Egg Die: (PPP) (SSS )
Large Easter Shadow Die (PPP) (SSS)
Easter Banner Greetings Stamp (PPP) (SSS)
Banner Greetings 3 Dies (PPP) (SSS)
Scalloped Pierced Plate (PPP) (SSS)
For my sentiment I’m using the new Large Easter Shadow Die die-cutting it out the the Orange and the shadow from Vellum.
Next, I stamped out the “Joyful Easter Wishes” using the new Easter Banner Greetings Stamp and die-cut it out with the Banner Greetings 3 Dies.
I attached the banner to the Easter word with liquid glue, then adding small foam squares to the back of the banner. This made it easier to the dap glue on a few areas behind the Easter not on the vellum. Then carefully placing it on the egg.
Adhering the panel onto a standard A2 side fold card base.
Compensated affiliate links used when available. If you place an order after clicking on one of my links, I will receive a small commission at no cost to you. Make sure to accept cookies. Thank you for your support!
Thanks for stopping by, remember the release is February 5th. My links will be working actually like at 9pm Pacific standard time on the 4th of February!


Leave a comment