Hi crafty friends, today I have the new Christmas Bucket Additions Dies from Pretty Pink Posh Holiday Release. I love how Pretty Pink Posh Stamps keeps bringing out new addition dies so we can stretch our stash.
With this new release the ideas were just coming out of me and I knew I wanted to bring out the previously released Candy Bucket Shaker Dies!
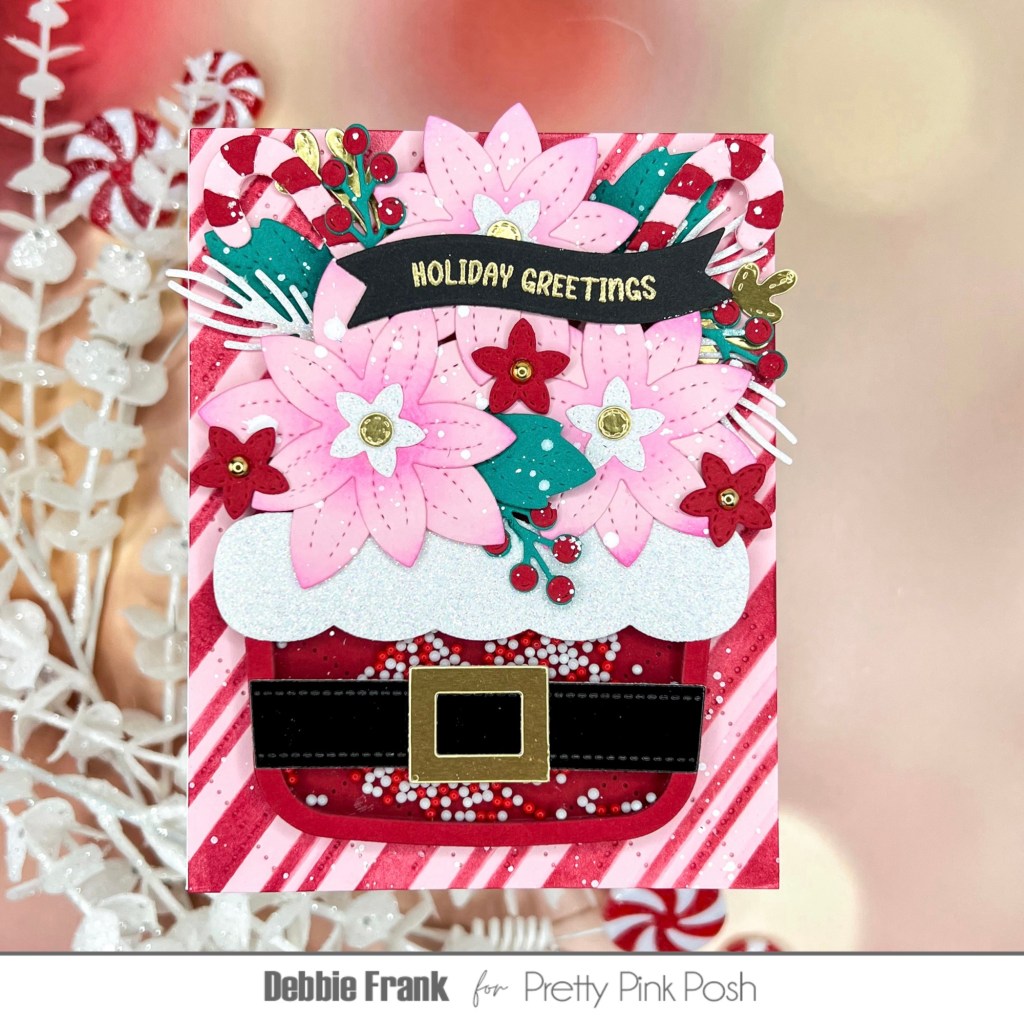
So to start off I used the new Argyle Pierced Plate and a standard Pink A2 panel and ran it through my Platinum 6 machine. Next, I placed the panel on my grip mat with the Candy Cane Strip stencil over it. Ink blended on a red ink on the pink pierced panel. Then I added on some white splatters. Set it to the side to dry.
Next, with the Candy Bucket Shaker Dies, I die cut out with the two dies taped together for the shaker from red card stock six times. Then with the outer die I die cut out from acetate and a red panel to seal up the shaker. But before I adhered it all together I ran the whole bucket through with the Argyle Pierced Plate dies. Attaching the acetate and then the shaker well onto the one red frame, I filled the well up with the Candy Cane Shaker Beads and seal it up with the pierced red bucket panel.
With the Santa belt from the Christmas Bucket Additions, I die cut it from Glossy Black and gold card stocks. It’s a Christmas Card so the fringe of the bucket has to have glitter!
Now it’s time to fill up the bucket, so with the previously released Winter Foliage Dies , one large and two small flowers from pink, a some tiny red flowers. The same ones that were in the centers for the larger ones with Pixie Dust glitter card stock. I also added in some gold and Pixie dust foliage.
Also in the Christmas Bucket Additions I die cut out, a couple of Candy Canes going both directions.
I threw all the die cut pieces into my splat box and splattered on some white goodness!
After I assembled all the flowers together, popping up some and tucking in foliage and the candy canes.. I still need to find a sentiment and area to place it! I stamped and gold heat embossed the “Holiday Greetings” from the Christmas Banner Greetings stamp set. Then trimming it out the Banner Greeting 1 die set.
I love shopping my stash and using a previously released products. What is your go to in your stash?
Affiliate links are attached with no extra cost to you.
Thanks for stopping by and have a crafty day.


Leave a reply to Franklyjustcards Cancel reply